
You know the feeling instantly. Your tongue hits a sharp, jagged edge where a smooth surface used to be. Perhaps you feel the appliance snap while chewing a piece of bread. Panic sets in immediately. It is Friday night, your dentist’s office is closed until Monday, and you have a wedding, a job interview, or a family gathering tomorrow. As a Certified Dental Technician (CDT) who has spent over 20 years fabricating and repairing dental prosthetics in the lab, I understand your situation.
Table of Contents
A broken appliance is not just a mechanical failure; it is a social emergency. If you are in a bind and need to attempt DIY dental flipper repair, you must do it correctly to avoid ruining the appliance permanently or injuring your mouth.
I have seen thousands of appliances come across my workbench. While my professional advice is always to seek a permanent repair from a licensed dentist, I know that life does not always adhere to clinical hours. You need a solution now. This guide is not a craft project. It is a modified clinical protocol adapted for home use.
In this article, we will bypass the bad advice found on forums. We will focus on the “salt-and-pepper” acrylic technique. We will discuss the dangers of super glue. Most importantly, we will cover the critical safety steps required to fix a flipper at home effectively.
Quick Answer: How to Fix a Flipper at Home
To safely perform a DIY dental flipper repair, follow this condensed protocol:
- Clean and Abrade: Wash the fracture with non-oily soap. Roughen the edges with an emery board to create surface area.
- Stabilize: Secure the pieces together on the non-tissue side. Use sticky wax or a wood matchstick as a brace.
- Apply Acrylic: Use an FDA-approved repair kit containing liquid monomer and powder polymer. Do not mix a paste. Dip the brush in liquid, pick up a bead of powder, and apply it to the fracture.
- Cure: Soak in warm (not boiling) water for at least 12 to 24 hours. This eliminates toxic chemicals and hardens the plastic.
Key Statistics: Denture Repair & Usage
- 41 Million: The estimated number of Americans wearing dentures or partials (ACP).
- $400: The average high-end cost for a professional lab repair of a single fracture.
- 60%: The approximate strength restored by a DIY repair compared to the original uncut material.
- 24 Hours: The minimum time required for methyl methacrylate monomer to fully evaporate and become safe for oral use.
- 3-5 Years: The average lifespan of a temporary acrylic flipper before material fatigue sets in.
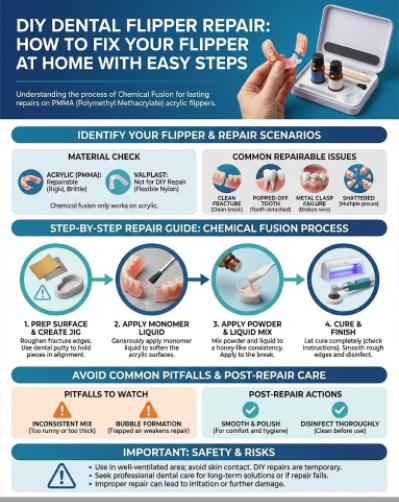
Understanding Your Appliance: What is a Flipper?
Before you attempt any DIY dental flipper repair, you need to understand what you are holding in your hand. A dental flipper is clinically known as an interim partial denture. It is typically made from a material called Polymethyl Methacrylate (PMMA). In the lab, we refer to this as “cold cure” or “heat cure” acrylic resin.
PMMA is not just hard plastic. It is a sophisticated polymer chain. When we fabricate these in the lab, we mix a liquid monomer (Methyl Methacrylate) with a powder polymer. The liquid dissolves the surface of the powder particles. This causes them to fuse together into a solid mass. This is a chemical reaction known as polymerization.
Why This Matters for Repair
Because the flipper is made of acrylic, you cannot simply “glue” it back together. Glues sit on the surface. To truly fix a flipper at home, you must re-introduce the monomer (liquid) to the existing acrylic. This chemically melts the edges back into a single unit. Standard household adhesives fail because they do not facilitate this chemical fusion.
Identify Your Material: Acrylic vs. Valplast
This guide applies strictly to rigid acrylic flippers. You must identify if your appliance is repairable. Here is how to tell the difference:
- Rigid Acrylic: Hard, pink plastic that snaps if bent. This is repairable at home.
- Valplast/Nylon: Flexible, somewhat translucent material that bends without breaking. This is NOT repairable at home.
If you have a flexible partial, stop reading. Denture repair kits rely on acrylic chemistry. They will not bond to nylon. Applying acrylic to a flexible partial will result in the patch flaking off immediately upon insertion. This creates a dangerous choking hazard.
Pro Tip from the Lab: Look at the fracture line. If the break is clean and fits back together like a puzzle piece, you have a high chance of success. If the edges are shattered into dust or tiny crumbs, a DIY fix will likely alter the fit. This can cause pain or bone damage.
The Anatomy of a Fracture: Why Flippers Break
Understanding why your appliance broke helps you prevent future failures. Flippers are not designed for heavy chewing. They are esthetic placeholders. We call them “interim” prostheses because they are meant to be temporary.
The most common cause of breakage is “material fatigue.” Every time you chew, the acrylic flexes slightly. Over months or years, this flexing creates microscopic cracks. Eventually, these micro-cracks connect. The appliance snaps. This usually happens at the weakest point. This is often the midline or near a wire clasp.
Another common cause is “impact shock.” This happens when you drop the flipper into the sink while cleaning it. Porcelain sinks are unforgiving. The impact sends a shockwave through the rigid acrylic. It shatters instantly. To prevent this, always fill the sink with water or place a towel down before cleaning your appliance.
The “Super Glue” Danger Zone: Why Household Adhesives Fail
I cannot stress this enough. Do not use super glue. In my 20 years as a technician, the most common reason we declare a case “unrepairable” is because the patient used super glue first.
The Toxicity of Cyanoacrylate
Super glue is made of cyanoacrylate. While it bonds quickly, it is not designed for the wet environment of the mouth. When cyanoacrylate cures, it releases heat and chemicals. These can cause stomatitis or chemical burns on your gums. Furthermore, saliva breaks down the bond of super glue relatively quickly. You end up slowly ingesting those breakdown products.
Mechanical Destruction
From a technical standpoint, super glue creates a barrier. Acrylic repair requires the new plastic to chemically fuse with the old plastic. Super glue seals the “pores” of the acrylic. If you glue it and it breaks again, a professional lab cannot fix it easily. We have to grind away huge portions of your flipper to remove the glue residue. This often ruins the fit permanently.
Comparison: Household Glue vs. Dental Acrylic
To visualize why a proper dental acrylic resin kit is necessary, consider the differences in how these materials interact with your oral environment.
| Feature | Household Super Glue (Cyanoacrylate) | Dental Repair Acrylic (PMMA) |
|---|---|---|
| Biocompatibility | Toxic: Causes tissue burns and necrosis | Safe: FDA-approved for oral use (once cured) |
| Bond Type | Surface adhesion (weak in moisture) | Chemical fusion (molecular bond) |
| Water Resistance | Degrades quickly in saliva | Impervious to saliva once cured |
| Professional Repair | Makes future professional repair impossible | Can be ground down and re-repaired by a lab |
| Flexibility | Extremely brittle; snaps under bite force | Mimics the flexural strength of the original denture |
Triage: Is Your Flipper Repairable at Home?
Not every broken dental flipper is a candidate for a home fix. Before you buy a kit, you must assess the damage honestly. If you attempt to fix a complex break, you risk altering your bite. This is known as occlusion. A bad bite can lead to jaw pain or damage to your natural teeth.
Scenario A: The Clean Midline Fracture
This is the most common break. The flipper has snapped in half, usually down the middle. If you hold the two pieces together and they lock tight with no visible gap, you are green-lit for DIY dental flipper repair. This is the ideal scenario for the salt-and-pepper technique.
Scenario B: The Pontic (Tooth) Pop-Off
Sometimes the pink acrylic is fine, but a denture tooth has popped out. If you still have the tooth and it is not chipped, this is a very manageable repair. You will use the acrylic to re-bond the tooth into its socket. This is often easier than fixing a base fracture.
Scenario C: The Metal Clasp Failure
If the metal wire that hooks around your tooth has snapped, stop immediately. You cannot fix metal with acrylic. Acrylic will not bond to the metal wire with enough strength to withstand the torque of insertion. This requires laser welding or soldering at a professional lab. Do not attempt this at home.
Scenario D: The Shatter
If your flipper looks like a dropped dinner plate, do not attempt this. If there are three or more pieces, or tiny shards are missing, the case is hopeless for a home repair. The cumulative error of gluing multiple pieces will result in an appliance that does not fit. You need a new impression.
Tools and Materials: The Dental Technician’s Shopping List
To replicate the lab process, you need specific materials. You cannot find these at a hardware store. You need a pharmacy or a specialized online retailer.
The Kit
Look for a commercial denture repair kit. Brands like Dentemp or DenTek are common. Ensure the kit contains two specific items. First, you need Liquid Monomer. This is usually Methyl Methacrylate. It has a strong, distinctive smell. Second, you need Powder Polymer. This is usually pink or clear acrylic powder.
Household Supplements
The kit alone is rarely enough for a high-quality job. Gather these additional items to ensure success:
- Emery Board/Sandpaper (100-200 grit): You need this for roughening the surface.
- Vaseline (Petroleum Jelly): This acts as a separating medium. Acrylic will not stick to Vaseline.
- Wooden Matchstick or Toothpick: You will use this as a splint.
- Sticky Wax or Chewing Gum: This holds the splint in place.
- Warm Water Bowl: This simulates a pressure pot for curing.
- Small Fine Artist Brush: If the kit brush is too large or clunky, use a finer one.
Step-by-Step Guide: The “Salt-and-Pepper” Technique
In the lab, we rarely mix a cup of acrylic and pour it like batter. That introduces air bubbles. Bubbles weaken the repair significantly. Instead, we use the “salt-and-pepper” or “bead” technique. This allows for precise control. It results in a stronger, denser plastic.
Step 1: Surface Preparation (Mechanical Retention)
Acrylic bonds best to a rough, clean surface. First, wash the pieces with dish soap to remove saliva and oils. Dry them thoroughly. Use your emery board to gently sand the fractured edges. You want to remove the glossy shine.
Here is the trick. If you are feeling confident, create a small “bevel” along the fracture line. This is a V-shaped channel on the polished side (the side that does not touch your gums). This increases the surface area for the new acrylic to grab onto. Do not touch the tissue side (the side touching the gums) with the sandpaper if you can avoid it. You want to preserve the fit against your palate.
Step 2: The Jig (Stabilization)
You cannot hold the pieces with your fingers while applying the acrylic. They will shift. You need to build a jig.
1. Fit the broken pieces together perfectly.
2. On the polished side (the side your tongue touches), apply a small dab of sticky wax or chewing gum across the break.
3. Embed a matchstick or toothpick into the wax or gum to act as a splint.
4. Now, carefully turn the flipper over. The fracture line on the tissue side should be open and accessible. The pieces are locked in place by your splint.
Step 3: The Application (The Expert Method)
This is the critical moment in your DIY dental flipper repair. Take your time.
- Pour a small amount of liquid monomer into one container. Pour the powder polymer into another.
- Dip your brush into the liquid.
- Touch the tip of the wet brush to the powder. A small bead of acrylic will form on the tip. It will look like a ball of wet sand.
- Place this bead into the fracture line. It will flow like honey.
- Repeat this process. Work your way down the crack. The liquid will melt the old plastic and the new powder together.
- Slightly overfill the crack. Acrylic shrinks about 6% when it cures. You need a little bulk to compensate for this shrinkage.
Step 4: Curing (The Critical Wait)
Most kits say “cures in 10 minutes.” As a technician, I tell you: do not trust that. While it may feel hard, the chemical reaction is still occurring.
Place the repaired flipper in a bowl of hot tap water. Do not use boiling water. Boiling water warps acrylic and ruins the fit. Leave it there. Ideally, let it sit for 12 to 24 hours. This serves two purposes. First, it drives the reaction to completion, making the plastic stronger. Second, it leaches out the residual monomer. Monomer tastes terrible and burns the gums.
Advanced Troubleshooting: Common Pitfalls
Even with a good guide, things can go wrong. Here is how to handle common issues during the process.
The Mix is Too Runny
If the acrylic runs all over the place, you are using too much liquid. Clean your brush. Dip it in less liquid next time. You want a bead that holds its shape for a second before flowing.
The Mix is Too Dry
If the powder looks white or chalky on the repair, it is too dry. It did not get enough liquid to polymerize. Dab a tiny bit of pure liquid onto the white spot. It should turn clear/pink. If it stays white, that area will be weak.
Bubbles Appeared
If you see bubbles in the repair, you trapped air. Do not try to pop them while it is wet. Let it cure. You will have to sand them out later and potentially do a second small application to fill the divot.
Specific Scenario: Reattaching a Tooth (Pontic)
If a tooth has fallen off, the process is slightly different. The “socket” where the tooth used to be is likely smooth. You must roughen this socket with your emery board or a small tool. You need to scrape out old glue or debris.
Apply a small amount of the liquid/powder mix into the socket. Place the tooth back in. Here is the crucial part. You must ensure the tooth is fully seated. If the tooth sits “high” (even by a millimeter), it will cause problems. When you bite down, all the force of your jaw will hit that single tooth. This will break the repair again immediately. It can also cause severe pain. Visually check that the tooth is aligned with its neighbors before the acrylic sets.
Post-Repair Finishing and Safety
Once the dental acrylic resin has cured, your flipper will look messy. It will have “flash.” This is excess rough plastic sticking out.
Smoothing the Repair
Use fine-grit sandpaper to sand down the excess acrylic. You want it flush with the original surface. Run your finger over the repair. If you feel a catch, your tongue will feel a mountain. Your tongue is incredibly sensitive. A rough spot will cause a “decubitus ulcer” (a painful sore) within hours. Sand it until it feels smooth like glass.
Disinfection
You have been handling this appliance with non-sterile tools. Before putting it back in your mouth, scrub it with soap and water. Soak it in a commercial denture cleanser for 30 minutes. This kills the surface bacteria introduced during the repair process.
Comparison: DIY Repair vs. Professional Lab Repair
It is important to manage your expectations. A DIY dental flipper repair is a “spare tire,” not a new set of wheels.
| Feature | DIY Home Repair | Professional Lab Repair |
|---|---|---|
| Cost | $10 – $20 | $150 – $400 |
| Timeframe | Immediate (12-24 hours) | 1 – 3 Days |
| Strength | approx. 50-60% of original strength | 100% restored strength (often reinforced) |
| Esthetics | Colors may not match; visible line | Invisible repair; color matched |
| Longevity | Temporary (2 weeks max recommended) | Permanent solution |
| Equipment | Air dry / Warm water | 30 PSI Pressure Pot + Hydrocolloid Jig |
Risks of Long-Term Use of DIY Repairs
You might finish your repair, pop the flipper in, and think, “Good as new! I just saved $300.” This is a dangerous mindset. A home-repaired flipper is functionally different from a lab-repaired one.
Micro-Porosity and Stomatitis
Without a pressure pot, your repair is porous on a microscopic level. We use pressure pots in the lab to squeeze air bubbles out of curing acrylic. Without this pressure, your repair is full of tiny holes. These pores become hotels for bacteria and Candida (yeast). Wearing a porous appliance long-term often leads to Denture Stomatitis. This is a painful fungal infection of the palate that looks like angry red rash.
Bone Resorption
If your repair is slightly off-balance—even by a fraction of a millimeter—it will rock slightly when you chew. This rocking motion acts like a slow extraction force. It pushes on the adjacent teeth and the underlying bone. Over time, this causes the bone to dissolve. We call this resorption. This can ruin the fit of future dentures and even loosen your natural teeth.
Aspiration Risk
Because the bond strength is only about 60%, there is a real risk of the flipper breaking again. This could happen while you are sleeping or eating. Small broken pieces can be aspirated (inhaled) into the lungs. This requires emergency surgery. This is why we strongly advise against sleeping with a DIY-repaired appliance.
Living with a Repaired Flipper: Diet and Care
Once you have performed the DIY dental flipper repair, you must change your habits. You cannot treat this appliance like natural teeth.
The Soft Food Diet
Until you see a dentist, you are on a soft food diet. Avoid anything that requires a “shearing” force. This includes steak, crusty bread, bagels, and raw apples. Stick to pasta, fish, eggs, yogurt, and cooked vegetables. The repair cannot handle the torque of tough foods.
Bilateral Chewing
Try to chew on both sides of your mouth simultaneously. This sounds difficult, but it balances the flipper. If you chew only on one side, the flipper will tip. This tipping force puts stress exactly where you just repaired it. Distributing the load helps keep the repair intact.
Nighttime Removal
Take the flipper out at night. This is standard advice for any denture wearer, but it is critical for a repaired one. Your jaw muscles can clench with massive force while you sleep (Bruxism). A repaired flipper will not survive a night of grinding. Place it in water or denture solution while you sleep.
When to Call the Dentist
While this guide empowers you to handle an emergency dental appliance fix, you must know when to throw in the towel. Call your dentist immediately if you experience certain symptoms.
- You notice swelling or redness in the gums under the repair.
- The flipper feels “tight” or puts pressure on a natural tooth.
- You cannot close your mouth completely without hitting the flipper first.
- The break involves a metal clasp or rest.
Ultimately, a flipper is a temporary device. If yours keeps breaking, it may be time to discuss a Cast Metal Partial or a flexible Valplast partial with your dentist. These offer superior strength and longevity compared to a simple acrylic flipper.
Summary & Key Takeaways
Fixing a broken dental flipper at home is a viable stop-gap measure if done with care and the right materials. By using the “salt-and-pepper” technique with a proper denture repair kit, you can create a chemical bond. This is far superior to the disaster of super glue.
Remember these core rules to ensure safety and success:
1. Never use super glue (Cyanoacrylate).
2. Clean and roughen the surface for mechanical retention.
3. Allow 24 hours for the acrylic to cure and detoxify.
4. Treat this as a temporary solution until you can see a professional.
Your smile is an asset, and your dental health is vital. Use this guide to get through the weekend. But let the pros handle the long-term solution. A professional repair ensures your bone health and bite remain compromised.
Frequently Asked Questions
Can I use household super glue to fix my dental flipper?
As a Certified Dental Technician, I strongly advise against using cyanoacrylate (super glue). It is toxic to oral tissues and can cause chemical burns or stomatitis. Furthermore, super glue creates a surface barrier that prevents the chemical fusion required for a lasting repair. Once super glue is applied, a professional lab often cannot perform a permanent fix because the adhesive ruins the acrylic’s porosity.
How can I tell if my flipper is made of acrylic or a flexible material like Valplast?
This is a critical distinction for repair safety. Rigid acrylic (PMMA) is hard, pink, and will snap if bent; this material is compatible with standard repair kits. Flexible partials like Valplast or nylon are translucent and bendable. You cannot repair flexible materials at home because dental acrylic resin will not bond to nylon, creating a significant choking hazard if the patch detaches in the mouth.
What is the ‘salt-and-pepper’ technique mentioned in the repair guide?
In the dental lab, we use this method to minimize air bubbles and maximize material density. Instead of mixing a paste, you dip a fine brush into the liquid monomer, pick up a small bead of powder polymer, and apply it directly to the fracture. This allows the liquid to chemically melt the edges of the existing acrylic, creating a molecular bond rather than just a weak surface seal.
Why is it necessary to soak the repaired appliance for 12 to 24 hours?
While the acrylic may feel hard in minutes, the polymerization process continues for hours. Soaking in warm (not boiling) water drives the chemical reaction to completion, increasing the strength of the repair. Critically, it also leaches out residual methyl methacrylate monomer, which is an irritant that can cause a burning sensation or allergic reaction in the oral mucosa.
Can I repair a broken metal clasp or wire at home?
No. Metal components like wrought wire clasps or rests cannot be fixed with acrylic resin. The torque and tension required to hold a flipper in place will cause the acrylic-to-metal bond to fail immediately. Metal repairs require professional laboratory equipment, such as laser welding or soldering, to ensure the appliance stays secure and doesn’t damage your natural teeth.
How do I stabilize the broken pieces during the repair process?
You must create what we call a ‘jig.’ Fit the pieces together perfectly on the polished side (the side your tongue touches) and secure them with a splint, such as a matchstick or toothpick, held in place by sticky wax or chewing gum. This leaves the tissue side accessible for the repair material while preventing the pieces from shifting, which would ruin the clinical fit.
What should I do if a tooth (pontic) has popped off my flipper?
If the tooth and the socket are intact, this is a manageable repair. You must first use an emery board to roughen the socket and the base of the tooth to create mechanical retention. Use the salt-and-pepper technique to re-bond it, ensuring the tooth is fully seated and aligned. If it sits even slightly high, the occlusal pressure will cause the repair to fail instantly upon chewing.
Is a DIY flipper repair considered a permanent solution?
Absolutely not. A home repair typically restores only about 50-60% of the original material strength. Because it isn’t cured in a professional pressure pot, the material remains microporous, which can harbor bacteria and lead to fungal infections like Denture Stomatitis. Consider this a ‘spare tire’ solution to get you through an emergency until you can see a dentist for a professional reline or repair.
Why does the repair site feel like a sharp bump to my tongue?
The tongue is highly sensitive to even microscopic changes in the mouth. After the acrylic has fully cured, you must use fine-grit sandpaper or an emery board to sand down the ‘flash’ or excess material. The repair must be flush and smooth like glass. Any remaining roughness will cause painful decubitus ulcers (sore spots) within hours of wear.
Can I use boiling water to speed up the curing process?
Never use boiling water. While heat does accelerate polymerization, boiling water will exceed the glass transition temperature of the PMMA acrylic, causing the entire appliance to warp or distort. Even a fraction of a millimeter of warpage will make the flipper unwearable or cause it to put damaging pressure on your natural teeth and underlying alveolar bone.
What are the risks of wearing a poorly repaired flipper for a long time?
Beyond the risk of infection from microporosity, a misaligned repair can cause occlusal trauma. If the bite is off, the force of chewing is distributed unevenly, which can lead to accelerated bone resorption (shrinking of the jawbone) or the loosening of the natural abutment teeth that the flipper relies on for stability.
What kind of diet should I follow while wearing a repaired flipper?
You must switch to a soft food diet immediately. Avoid foods that require heavy shearing or grinding forces, such as crusty bread, steak, or raw apples. Practice bilateral chewing—masticating on both sides of the mouth at once—to distribute the load evenly across the appliance and minimize the tipping forces that could snap the temporary repair.
Disclaimer
This article is for informational purposes only and does not constitute professional medical or dental advice. A DIY dental flipper repair is a temporary measure and does not replace the need for professional evaluation. Using home repair kits incorrectly can result in permanent damage to the appliance, oral irritation, or choking hazards. Always consult a licensed dentist for a permanent repair to ensure proper fit and oral health.
References
- American College of Prosthodontists (ACP) – gotoapro.org – Source for statistics on the prevalence of denture and partial usage in the United States.
- U.S. Food and Drug Administration (FDA) – fda.gov – Information regarding the safety and regulation of Polymethyl Methacrylate (PMMA) in dental devices.
- Journal of Prosthetic Dentistry – thejpd.org – Peer-reviewed research on the flexural strength of acrylic resins and chemical bonding in dental lab repairs.
- American Dental Association (ADA) – ada.org – Clinical guidelines for the care and maintenance of interim partial dentures (flippers).
- Journal of Oral Rehabilitation – wiley.com – Research regarding the risks of porous dental materials and the development of Denture Stomatitis.